Welcome to my MugTo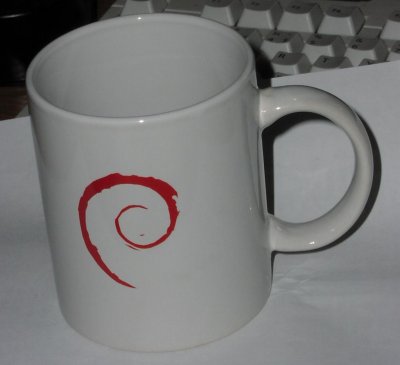 Adverts coming up... Well I've wanted some Linux/Debian logo mugs for some time now... But the ones in the shops were both expensive, sold outside my country and not always looking as I would like them to. Now there are nothing revolutionary about what I'm about to tell you... I guess... Now where to start, well you will need a mug. Some spray paint. A piece of self-adhesive plastic, I used some self-adhesive book wrapping (brand-name Ecolon). A printer or some other way to make some art for the mask. Now you need to make a paint mask, I first tried to print out the Debian logo on regular paper (remember to mirror the image), I the used tape to stick the paper to the back of the self-adhesive plastic. It however had a tendency towards getting torn, I then noticed that the backing of the plastic had somewhat rough texture, since I knew that a laser printer can print on most surfaces(that don't melt and that molten plastic will stick to(it can actually print on bakeing-paper)) I just had to try to give it a go through the printer. A word of WARNING putting plastic through a laser printer is never a wise thing to do, as molten plastic may ruin the drum among other things. DON'T SAY I DIDN'T WARN YOU! Now if you still want to give it a go... Here is how I did it. First I printed the logo on paper as before, I then placed a cut piece of the masking plastic over the logo (plastic facing down towards the paper NEVER expose the plastic to the drum!). I the fastened it using some PAPER (plastic it NO NO) tape at the top, if you also fasten it at other sides it may fold inside the printer if the paper and mask lengths are not exactly the same. I then put it through the printer, it almost went smoothly except it jammed the printer (the plastic had melted onto the paper, perhaps it was the jam that caused it to melt), anyway it had printed all of the logo before the jam so I was ready for the next stage (next time I will try to glue some paper to the masking plastic to See if that works as well). Now I just needed to cut out the logo, easier said than done but I eventually finished the task. The mug needs to be clean and dry where you are going to apply the paint, so wash it with soap and alcohol. Now you need to apply the mask, peel off a few cm of the backing, align the mask nicely, stick it on, and remove the rest of the backing while applying the plastic mask. Remember no bubbles or folds. You then have to make sure that the edges stick firmly to the mug, use your fingernails or another hard object... I then put the mug into a plastic bag (we don't want paint all over the cup), cut a suitable hole into the bag taped the hole to the mug, tie up the bag, now we are ready to paint. Now remember always paint outside, you don't want small aggressive blue smurfs coming after you, now do you? (btw. the smaller they are the more dangerous they are). Always start painting on something else that the mug, the stuff you have covered the ground with so that you don't paint the ground is good place to start. You have covered it right? Spray at a distance, not too close. Read the instructions on the can, they know how it works.. Now let the paint dry a couple of minutes, not too long just enough so that it will definitively will not run. Then get the mug out of the bag, remove the mask, now you should hopefully look at a nice mug with a nice logo painted on to it. Leave the mug to dry. Your mileage may vary, have fun! |
|
